
Your First OpenAI API Project in Python Step-By-Step
Image by Editor | ChatGPT
In a recent post, I demonstrated how to set up your first large language models (LLMs) that are downloaded and running with Ollama, a user-friendly framework supported by multiple platforms for running open models like Mistral, LlaMA, Gemma, and more. Within this project, we also implemented a lightweight REST API and web interface for user-model interaction, utilizing FastAPI.
Back by popular demand, we will now put together a similar step-by-step article which will navigate you through the process of creating another first-time project to use specialized LLMs, this time using the OpenAI API to access state-of-the-art models like GPT-4 instead of downloading and utilizing local models on your machine.
Warm-Up Readings
To get familiar or freshen up with familiar concepts and tools used in this article, here are some recommended or related readings:
And, of course, if you haven’t read the previous article in this series, Your First Local LLM API Project in Python Step-By-Step, you may want to do so now.
Still with me? OK, let’s do it.
Step-by-Step Process
In this tutorial, we will assume you have Python 3.9 or later installed on your machine, and that you have acquired a basic to intermediate understanding of the Python programming language. The code we will use can be implemented within a Python-friendly IDE like Visual Studio Code or similar — please note, due to the requirement of using several dependencies and the recommended use of a virtual environment, this may not be a suitable project to be run on a Google Colab instance or similar notebook environment in the cloud. Don’t worry, I will guide you through all of the necessary the setup steps.
Getting an OpenAI Key
To run your own OpenAI API project, you will need an API key. First, browse to the OpenAI website and sign up or log in if you have already registered for the OpenAI platform. If you are signing up, you can do so with your email address, Google, or Microsoft account. Then go to settings (gear icon on the top-right corner) and “Billing” on the left-hand side menu. You should see something like this:
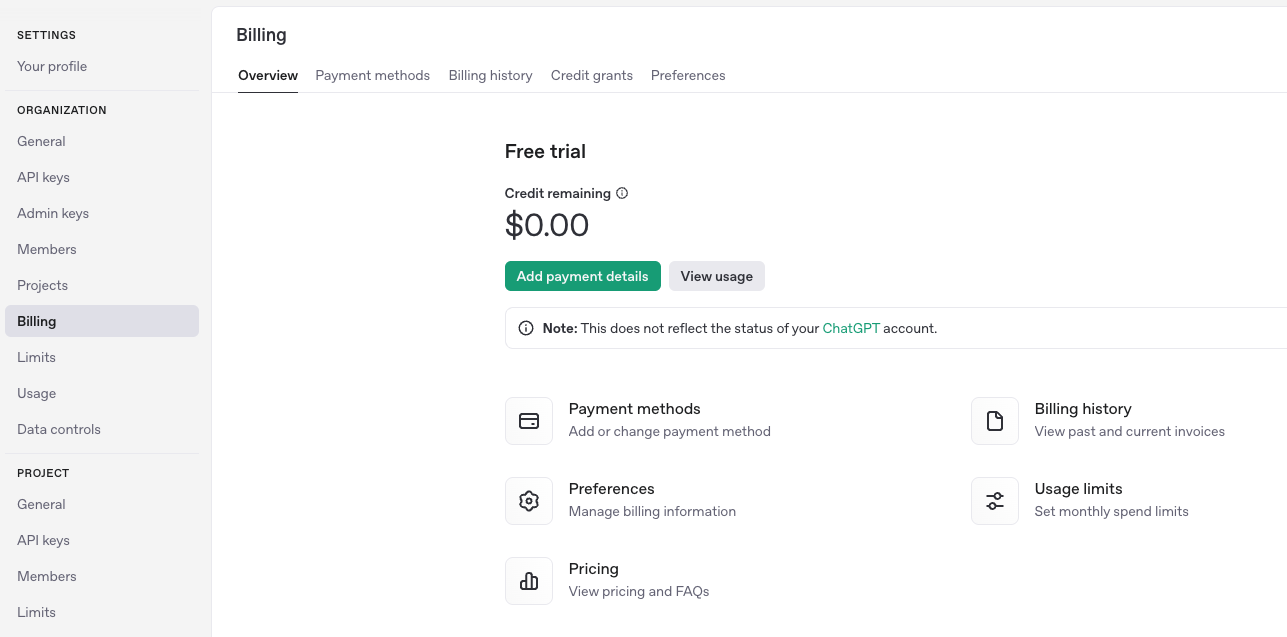
As of writing, getting reliable access to modern OpenAI models like GPT-4 requires a billing plan, either subscription or pay-as-you-go. During the process, you’ll be asked for your debit/credit card details and a billing address, and a simple account verification process will follow.
Next, go to the API keys page and create a new API key by clicking + Create new secret key on the top-right corner. The generated key should be of the format sk-XXXXX, where XXXXX is a long alphanumeric string which may also contain some special characters like dashes and underscorees. You’ll need to copy and paste this API key later.
Setting Up a Python Project and Virtual Environment
Assuming you are using VS Code (you may need to take slightly different actions if working with other IDEs), let’s create a new project folder in the file directory on the left-hand side, and call it openai_api_hello or similar: as this is our first OpenAI API project, the “hello” as part of the project name stands for the ubiquitous “Hello World”!
Inside the folder, we will add two more files: main.py and requirements.txt. We will leave the Python file empty for now, and add this content to the requirements.txt file:
|
fastapi uvicorn openai python–dotenv |
These are the libraries and dependencies we will need to install in the virtual environment where the project will be run. Make sure you save the changes in the modified file.
Setting up a virtual environment is recommended when working with projects requiring multiple dependencies because it isolates them, prevents conflicts among library versions, and keeps some sense of order in your “development ecosystem.” You can set it up by:
- Opening the command palette by pressing Command + Shift + P.
- Selecting Python:Create Environment from the drop-down list, of manually typing it, then selecting venv.
- You may choose between creating a new virtual environment or choosing an existing one: we recommend creating it for a first-time project like this. Then, choose a suitable Python version (I chose Python 3.11).
- You should now be prompted to pick the
requirements.txtcreated earlier and install the listed dependencies. This is very important, as we will need FastAPI, Uvicorn, OpenAI, and Python-dotenv for our Python project to work.
If the last step does not work, try running this in the IDE’s terminal:
|
pip install fastapi uvicorn openai python–dotenv |
Main Python Program
Time to populate the empty main.py file we created before, by adding the following code:
|
1 2 3 4 5 6 7 8 9 10 11 12 13 14 15 16 17 18 19 20 21 22 23 24 25 26 27 28 29 30 31 32 33 34 |
from fastapi import FastAPI, HTTPException from pydantic import BaseModel import os from openai import OpenAI from dotenv import load_dotenv
from dotenv import load_dotenv import os
# IMPORTANT: PASTE YOUR OPENAI API KEY BETWEEN THE “” HERE: client = OpenAI(api_key=“sk-…”)
app = FastAPI()
class ChatRequest(BaseModel): message: str
@app.post(“/chat”) async def chat(request: ChatRequest): try: completion = client.chat.completions.create( model=“gpt-4”, messages=[ {“role”: “system”, “content”: “You are a helpful assistant.”}, {“role”: “user”, “content”: request.message} ] ) return {“response”: completion.choices[0].message.content} except Exception as e: raise HTTPException(status_code=500, detail=str(e))
@app.get(“/”) def root(): return {“message”: “Hello, World”} |
Before going further, let’s take a look at the different parts of the code. Trust me, it’s pretty simple:
First, the necessary libraries and modules are imported, along with the os native library. We don’t need it in this version of the code, but if this first attempt works, you might want to come back to your Python code and accessing your API key stored in an additional file within your project called .venv that contains it, instead of directly pasting the whole API key in the Python program. We will elaborate on this shortly.
Very importantly, in this line,
|
client = OpenAI(api_key=“sk-XXXXX”) |
You must paste your previously generated OpenAI API key, specifically replacing the sk-XXXXX string with your actual key, keeping the quotation marks on both sides. Alternatively, if you want to have your API key stored in a separate file, create a file called .venv in your project folder, and add:
|
OPENAI_API_KEY=<YOUR KEY GOES HERE> |
To access the key using this approach, replace the following instruction:
|
client = OpenAI(api_key=“sk-XXXXX”) |
With this one:
|
load_dotenv(dotenv_path=os.path.join(os.path.dirname(__file__), “.env”))
api_key = os.getenv(“OPENAI_API_KEY”) print(“Loaded API key:”, api_key) # Useful for debugging and potential troubleshooting, remove if it works.
if not api_key: raise RuntimeError(“OPENAI_API_KEY not found in environment variables”) |
If you just decided to keep your API key pasted in the Python file code, you don’t need to take the last couple of steps. Let’s look at more parts of the code:
|
app = FastAPI()
class ChatRequest(BaseModel): message: str |
The first instruction creates an instance of FastAPI application based on a web API that serves requests. The second instruction defines a so-called Pydantic model that FastAPI utilizes to validate and parse inputs or requests in a smooth fashion, expecting the body of requests to be in JSON format. The message: str instruction adds a field called “message” to the body of the request, with its value being a string, where the user prompt for the LLM will be later specified.
The main function of the program is this one:
|
@app.post(“/chat”) async def chat(request: ChatRequest): (...) |
This is where the main logic of the API is defined, namely by creating an instance to access the GPT-4 model, sending inputs to it, and collecting responses.
Running and Testing the Project
Save the Python file, and click on the “Run” icon or run python main.py in the terminal. You will also need to run the following command in the IDE terminal (for this, very important, make sure you are located in the right directory of your project and the virtual environment is activated):
|
uvicorn main:app —reload —port 8010 |
If you see a sequence of ‘INF0’ messages being output like this, that’s a good sign and your FastAPI server is now running:
|
INFO: Will watch for changes in these directories: [‘<PATH_IN_YOUR_MACHINE>/openai_api_hello’] INFO: Uvicorn running on http://127.0.0.1:8010 (Press CTRL+C to quit) INFO: Started reloader process [98131] using StatReload INFO: Started server process [98133] INFO: Waiting for application startup. INFO: Application startup complete. |
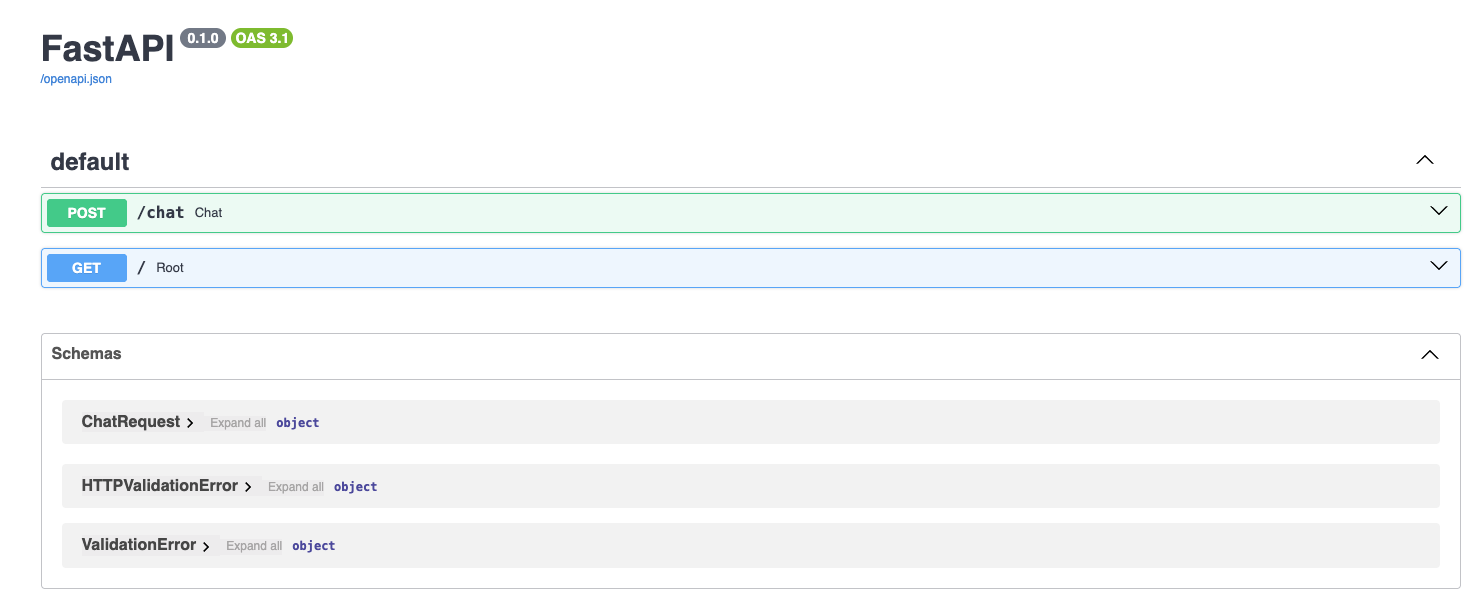
The service is now accessible via http://127.0.0.1:8010/docs (here we used port 8010, but make sure you are using the right port for you). Open this URL on your browser, and if everything went correctly, you’ll see a FastAPI Docs Web interface like this:
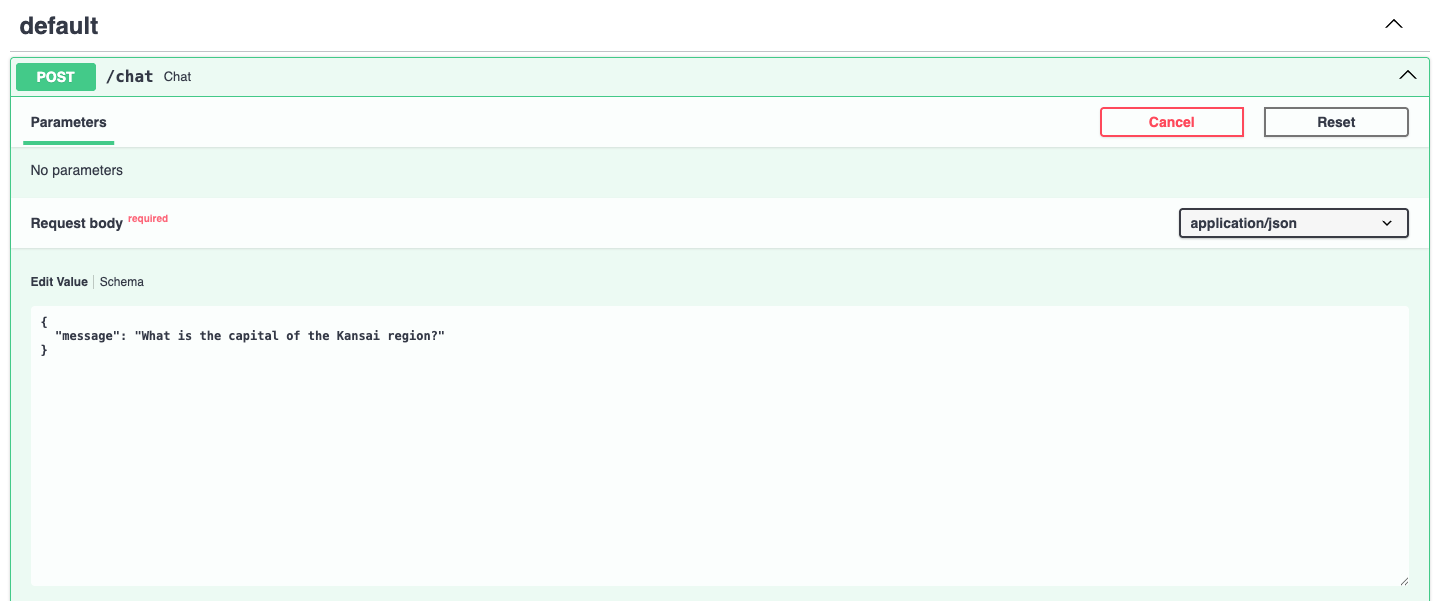
We are about to the most exciting part of the process: testing our API project! In the interface displayed, click the arrow beside the POST/generate box to unfold it, and click the “Try it out” button.
Here, you can enter a prompt of your choice to ask GPT-4 a question. You must do it in a dedicated JSON-like parameter value, as shown below, by replacing the default prompt: "string". For instance:
Once you click the “Execute” button, in a few seconds you may get the response by slightly scrolling down:
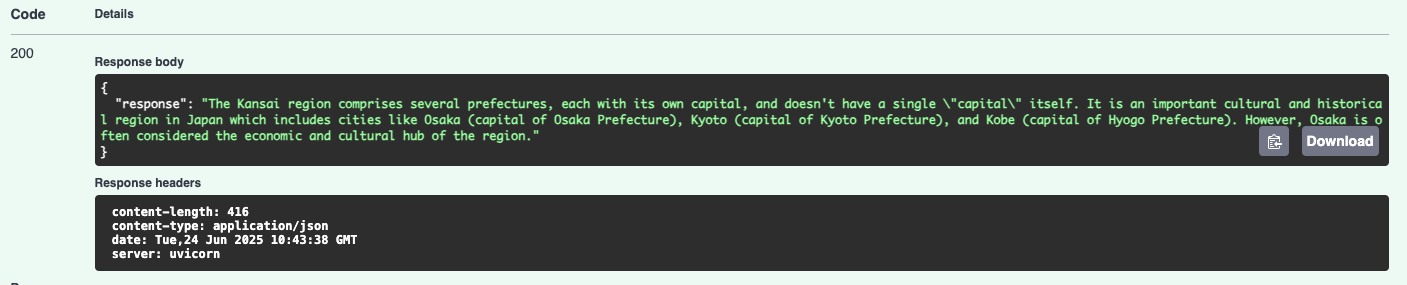
Well done, your API project is now starting the conversation with OpenAI’s GPT-4 model!
After this first project, you may wonder what to do next. Possible ideas for follow-up developments could include adding a frontend UI using technologies like React or Vue, or HTML combined with JavaScript, or even Streamlit. Improving error handling procedures is another logical approach, or trying out other OpenAI models like GPT-3.5 or o3.
Concluding Remarks
This article illustrated in a step-by-step fashion how to set up and run your first local OpenAI API Project for using OpenAI state-of-the-art models like GPT-4, based on FastAPI for quick model inference through a Web-based interface. If you haven’t checked the related tutorial on building your first local LLM project (linked at the top of this article), don’t miss it!