When I’m off the clock, repetition relaxes me. I will happily fold laundry, water my plants one by one, or rewatch a movie I’ve seen a zillion times. Some repetitive activities I just find meditative and comforting.
Unless I’m working. Then I want efficiency. If you’ve ever found yourself unhappily building the same steps across multiple workflows, you know what I mean.
With Sub-Zaps, you can create a sequence of steps—just once—then insert that sequence into any Zap, saving you valuable time for more productive work. For a closer look at how to automate smarter with Sub-Zaps, keep reading.
Skip ahead
Zapier is the most connected AI orchestration platform—integrating with thousands of apps from partners like Google, Salesforce, and Microsoft. Use interfaces, data tables, and logic to build secure, automated, AI-powered systems for your business-critical workflows across your organization’s technology stack. Learn more.
What are Sub-Zaps?
Sub-Zaps are reusable mini-workflows that let you build a set of steps once and plug that set into any Zap. Think of them as modular components you can call from as many Zaps as you’d like. The Sub-Zap receives data from your parent Zap, runs the steps you created, then sends the results back to the parent workflow.

Do you regularly use the same AI by Zapier prompt or have a standard way of formatting data across spreadsheets and project management records? That’s when building a Sub-Zap comes in clutch.
And you won’t just save time building steps—if you ever need to update them, Sub-Zaps make it all easy.
For instance, imagine your team has different job application forms that all use similar steps to standardize applicant details, send confirmation emails, and create profiles in your HR system. Managing two or three forms? That’s no big whoop. But if that figure swells to 20 or 30 forms, then you’ll have lots of clicking and remapping to do to build out every Zap. If your team decides to add a new step to the application process, updating all the Zaps could take a while. With this tool, you’d only have to modify one workflow, and all your parent Zaps that call your Sub-Zap would instantly receive the update.
Note: A Sub-Zap step doesn’t count toward your task usage, but each action within the Sub-Zap does.
Features of Sub-Zaps include:
-
A required trigger step: Every Sub-Zap begins with a trigger that defines what data it receives from your parent Zaps. This effectively gives you multiple triggers in a single workflow—your main Zap has its own trigger, and the Sub-Zap adds another.
-
Unlimited actions: Add as many action steps to your Sub-Zap as you need. They’ll run every time the Sub-Zap is called.
-
Optional mandatory fields: Prevent your Sub-Zap from running with incomplete information that could cause errors by adding the word “required” to an input field’s name. (Got a Sub-Zap that creates customer records, for example? You’ll want to require an email address since you can’t create a meaningful customer profile without one.)
What you can do with Sub-Zaps
Here are three ways to put Sub-Zaps to work:
Onboard new sales reps without exposing confidential details
Your sales operations team wants to create Zaps that automatically onboard new reps—but HR doesn’t want to give direct access to BambooHR, which contains confidential information, like salary data.
What this might look like:
-
A new employee gets added to BambooHR.
-
This event triggers an onboarding Sub-Zap (managed by HR in a separate Zapier account).
-
Inside the Sub-Zap, a BambooHR search step retrieves only the new hire’s basic information—name, email, start date, and manager.
-
A Return From a Sub-Zap step sends these details to the parent Zap.
-
The parent Zap continues, sending a welcome email to the new hire through Gmail with sales-related first-day instructions.

Standardize lead qualification across multiple channels
Your marketing team receives leads from various sources, but each channel captures slightly different information. You want to qualify and score every lead consistently before routing them to sales.
What this might look like:
-
A new lead comes in from an Eventbrite registration.
-
This event triggers your Sub-Zap.
-
Inside the Sub-Zap, Paths by Zapier creates branches based on company size: Path A for enterprise leads, Path B for mid-market, and Path C for small business.
-
In each path, AI by Zapier calculates a different lead score using criteria specific to that company size. It also determines the appropriate sales rep based on territory rules.
-
Each path ends with its own Return From a Sub-Zap step that sends the qualified lead data, score, and assigned rep back to the parent Zap.
-
The parent Zap creates a lead record in HubSpot, including the lead score, so the sales team can prioritize follow-up automatically.
When you build a Zap for leads coming from other sources, you can simply call the same Sub-Zap for consistent qualification.
Standardize data formatting across your spreadsheets and project tools
Your operations team needs consistent formatting for names, dates, and phone numbers across spreadsheets and project management tools, but data often comes in with inconsistent formatting.
What this might look like:
-
A new customer fills out a Typeform registration form.
-
The form sends raw data to a Google Sheets spreadsheet.
-
The new row in your spreadsheet triggers your Sub-Zap.
-
The Sub-Zap uses Formatter by Zapier steps to standardize capitalization and dates.
-
A Return From a Sub-Zap step sends the cleaned data back to the parent Zap.
-
The parent Zap sends the cleaned data to Asana.
If you build another Zap for data from a different source, you can call the same Sub-Zap to apply your preferred formatting automatically.
How to get started with Sub-Zaps
To set up a Sub-Zap, you’ll need to create two Zaps: one for your parent Zap and another for your Sub-Zap. Let’s start with the Sub-Zap:
-
Log in to Zapier and open the Zap editor.
-
Click the Trigger step, then search for and select Sub-Zap by Zapier.
-
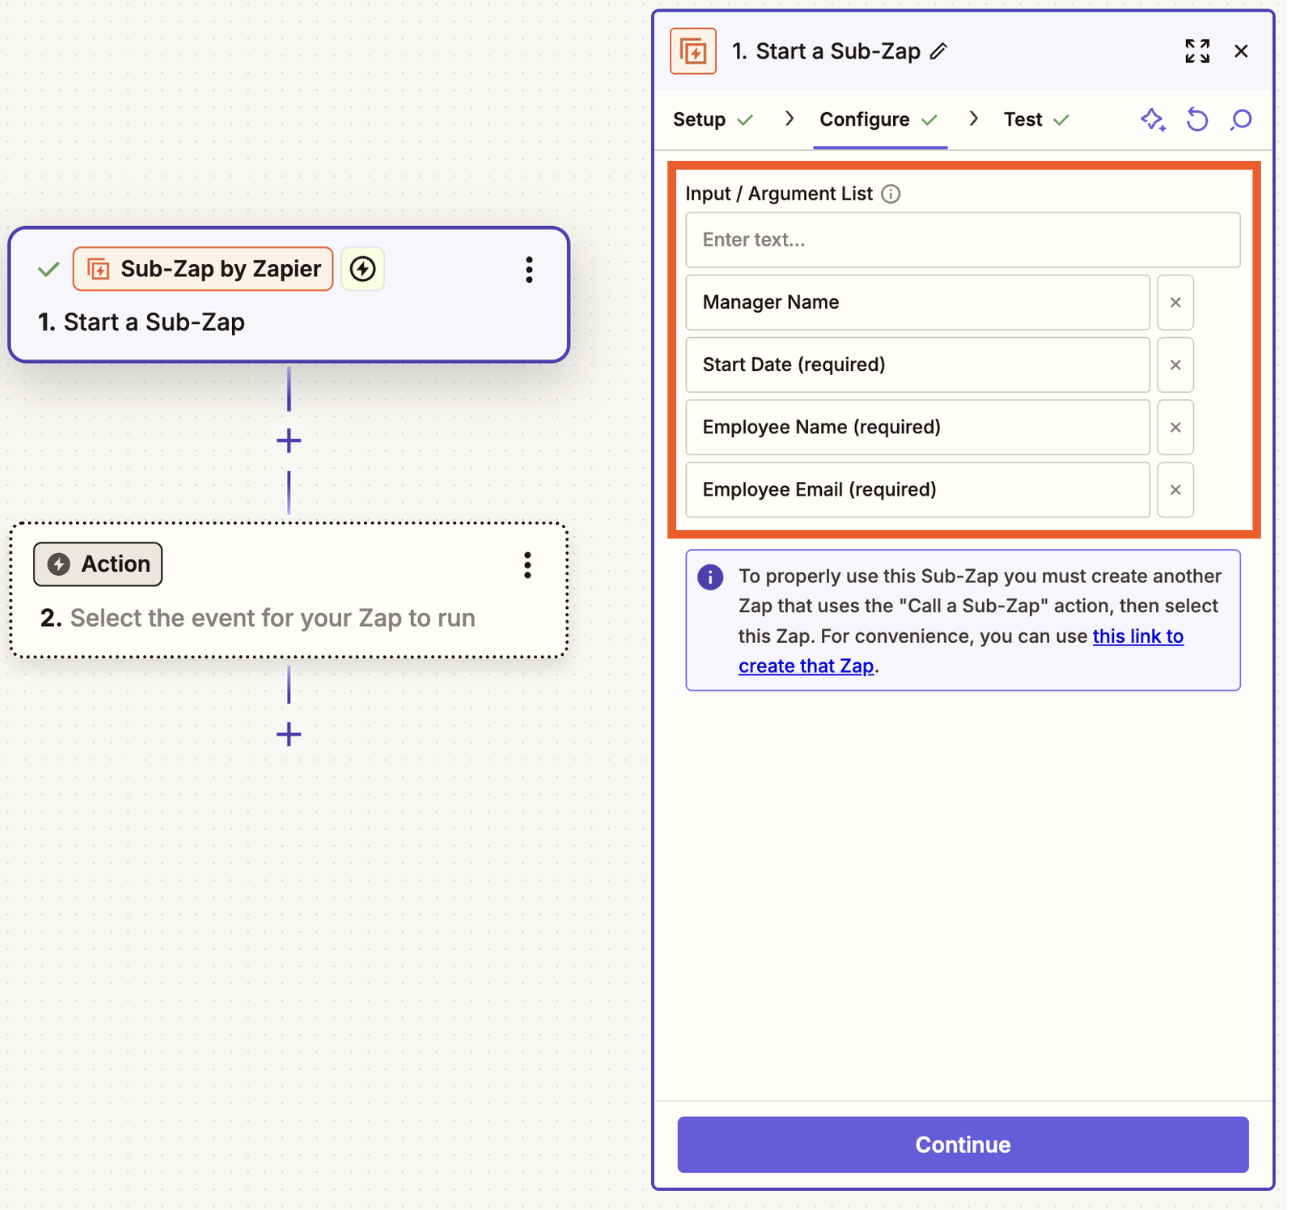
Choose Start a Sub-Zap for your trigger event. (It’s the only option.)
-
Next, add input names for the data you want to send to your Sub-Zap. Hit the return key after each input you add. To make a field mandatory, just type the word “required” anywhere in the input field name. When you’re finished, click Continue.
-
Click Test trigger. Because you haven’t connected your parent Zap yet, you’ll see the words missing sample data in the fields you created. Add action steps just like you would with a regular Zap. Include as many as you want to run every time the parent Zap calls this Sub-Zap.
-
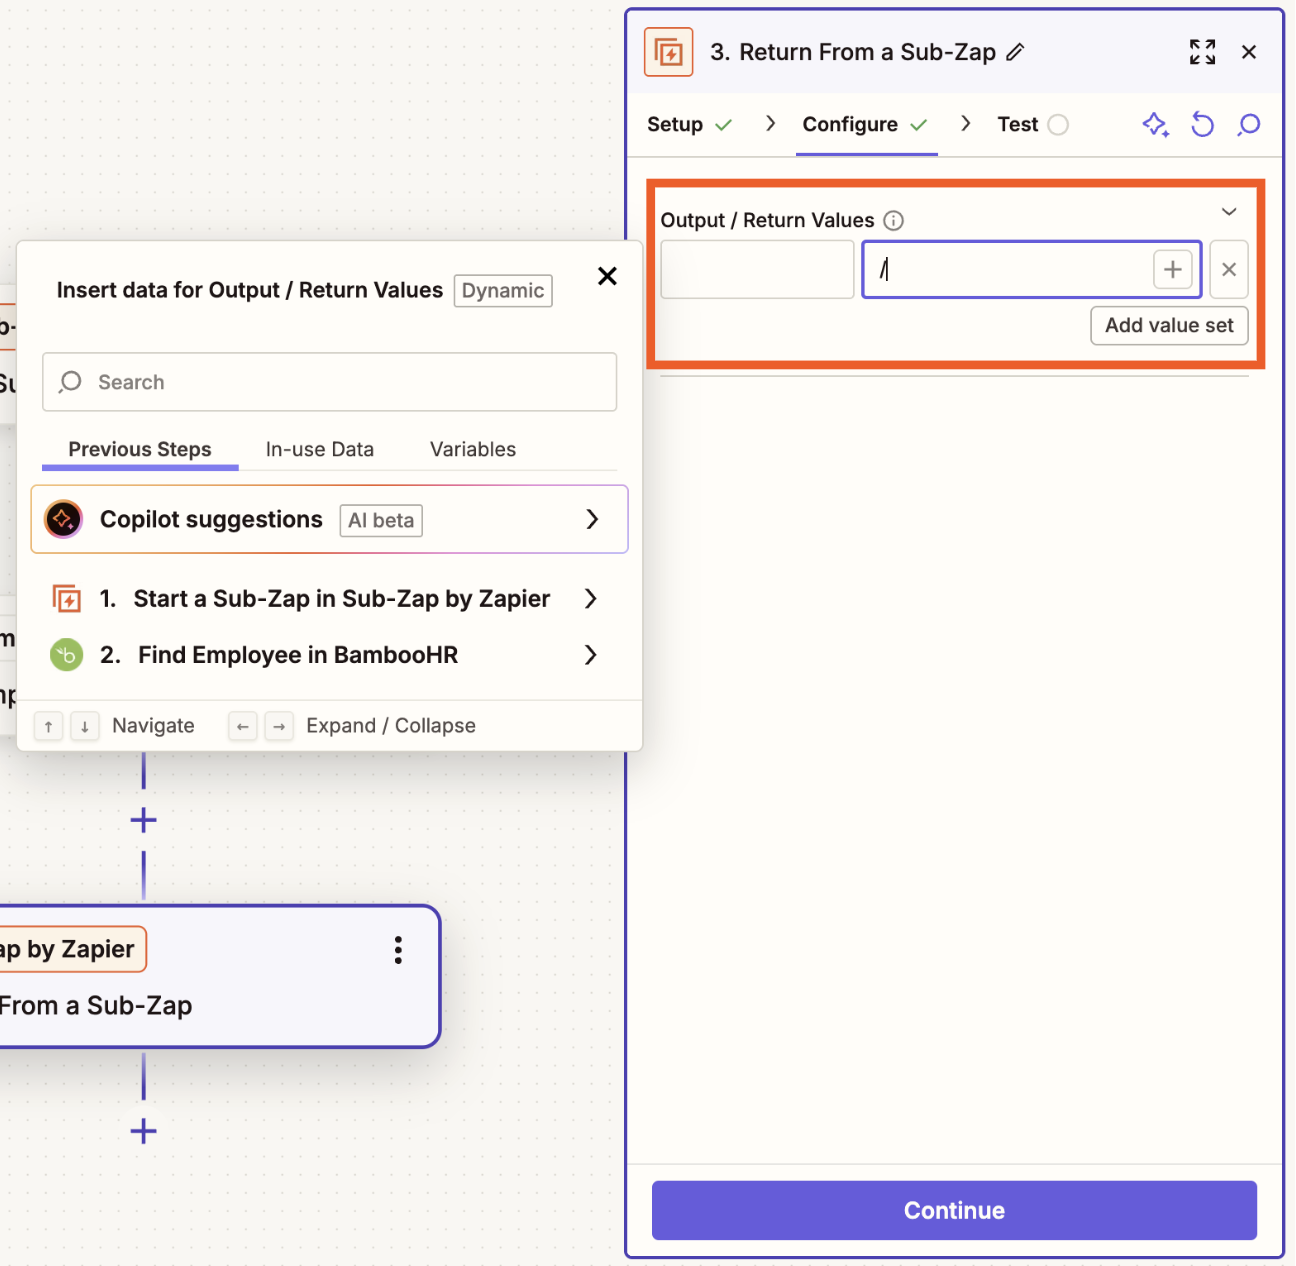
For your final step, add another Sub-Zap. In the dropdown menu, select Return from a Sub-Zap.
-
Set up your output values by mapping fields from previous steps. This is the data that will get sent back to your parent Zap. To map your data, click the + sign or type / in the field, then select the value you’d like to use from the dropdown.
-
Click Continue, then when you’re ready, test your Sub-Zap.
-
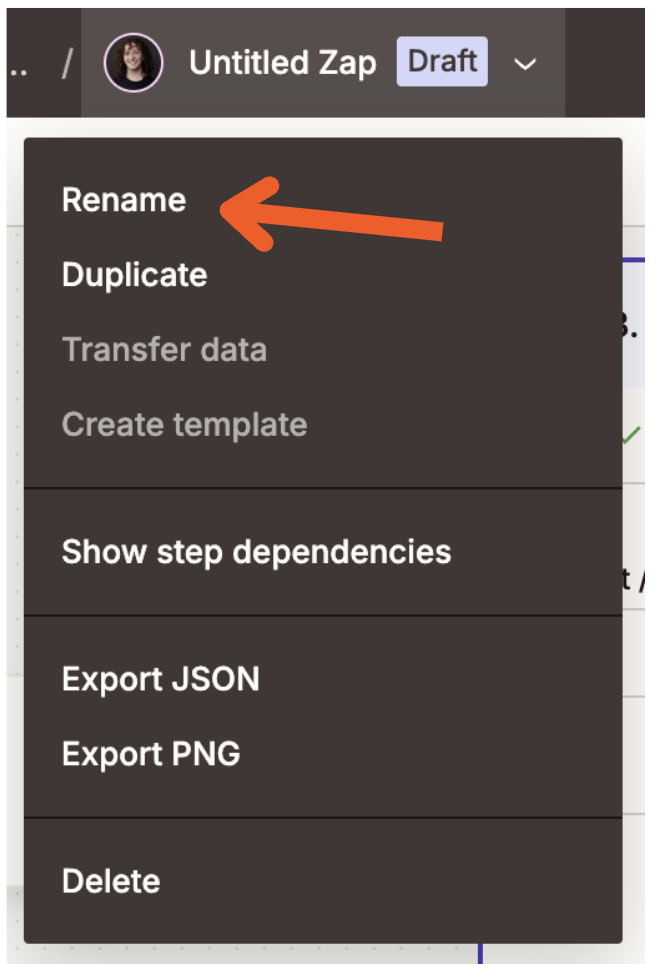
To make it easier to find your Sub-Zap later on, rename your Sub-Zap to something recognizable. You can do this by clicking Untitled Zap at the top of your screen in the Zap editor and clicking Rename.
-
Remember to turn on your Sub-Zap by clicking Publish.


Now, build your parent Zap (or return to it if it’s already in progress):
-
Build your workflow with any trigger and action steps you need.
-
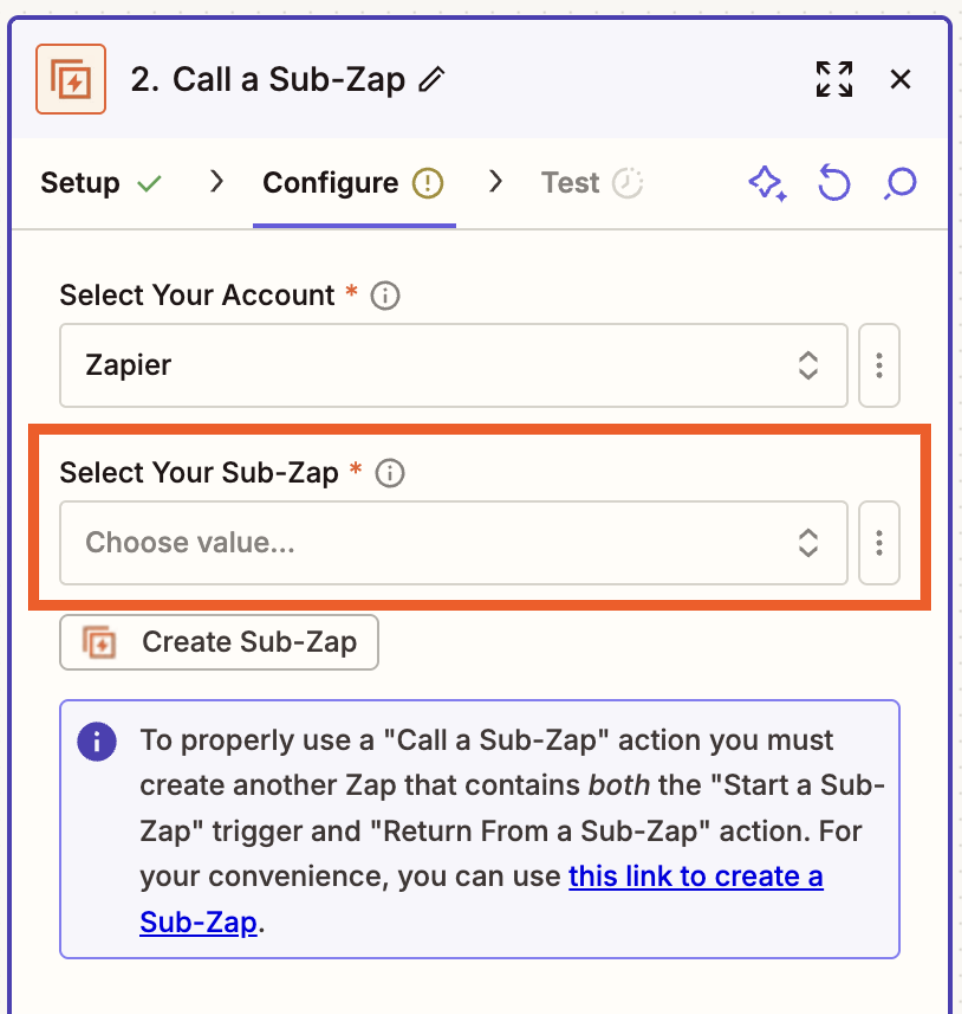
At the point where you want to call your Sub-Zap, add an action step, choose Sub-Zap by Zapier as the app, and choose Call a Sub-Zap.
-
Select the Zapier account where your Sub-Zap lives. Then, under Select Your Sub-Zap, look for the name you gave your Sub-Zap.
-
Map the data you want to send to your Sub-Zap, then click Continue.
-
Continue building the rest of your workflow with any additional actions.
-
When you’re done, test your Zap, then click Publish to turn it on.

You can repeat this process for as many parent Zaps as you’d like to use this Sub-Zap—build it once, and reuse it everywhere you need.
Streamline your Zap-building process
There’s no need to get stuck in echoes of the same workflow. With Sub-Zaps, you have a shortcut that lets you build more efficiently and enjoy the benefits of automation faster.
Ready to get started? Visit our Sub-Zap integration page for more inspiration, check out our Sub-Zaps help guide, or start building in the Zap editor.