Checking your inbox shouldn’t sink your whole morning. If you need a second cup of coffee by the time you’ve read and processed all your emails from leads, customers, and vendors, it’s probably time to rethink your approach to email management.
And an email parser could be just the antidote. Parsers extract important details from your emails and put them to work for you, so you can act on the data that’s driving your business. To learn how they work and how to set one up on Zapier, keep scrolling.
Zapier is the most connected AI orchestration platform—integrating with thousands of apps from partners like Google, Salesforce, and Microsoft. Use interfaces, data tables, and logic to build secure, automated, AI-powered systems for your business-critical workflows across your organization’s technology stack. Learn more.
Table of contents
What is an email parser?
An email parser is a tool that identifies only the most important data from your emails. Instead of manually scanning mountains of text in your messages, you can train an email parser to recognize patterns once—then automatically pull key info from every new email to feed to your other apps.
Think about how you read emails. When your boss or best friend messages you, you likely read every word. But for routine business stuff—invoices, order confirmations, support tickets—odds are, you skim for the details that matter most. Your eyes quickly dart across the screen, picking out keywords and phrases like Quote Request and $5,420 and Renewal Date: March 30. Email parsers work the same way, doing the skimming for you.
To get a better idea of how these parsers work, let’s build one. We’ll use Email Parser by Zapier, which connects securely to hundreds of AI tools and thousands of other apps in our app directory. But if you’re using another tool, these directions will still apply—the basics are much the same for most email parser integrations.
How to parse emails
1. Make a new Email Parser mailbox
The first step is the easiest. Just go to parser.zapier.com, and either create a new Zapier account or sign in with your existing account. Then click either of the Create Mailbox buttons to add a new mailbox.

Email Parser will then show you an email address that looks like this: c66jmdai@robot.zapier.com.
Copy that address and keep it handy. Later on, that’s where you’ll send emails to be parsed.
Note: In a later step, you’ll be able to edit this address. But remember that you want to keep it fairly hard to guess—otherwise, anyone can email the address and potentially clutter your workflow.
2. Send an email to the parser
Now that you have the new email address copied, open your email app, and find (or write) an email like the ones you want to use with your email parser. I’m going to have Email Parser tell me about new posts on the Zapier Blog (meta, I know), so I’m forwarding a recent email from Deb at Zapier. For whichever email you choose, type your @robot.zapier.com email address in the To field and click Send.

3. Teach the parser how to read your email
Once Email Parser receives your email, it shows a text version of your email in the Initial Template box. All you need to do is find the important data and tell the parser that this is what to copy.
Scroll down to the text that you want Email Parser to copy, and select it. With the email I’ve used, I want to know the headlines under “Recommended reading from the Zapier blog team,” so I select the text from each of those. For each piece of text you select, type a name for that item in the box and click Save. Email Parser will replace the text with the name in curly brackets, like {{headline1}}.

Repeat that for each piece of text you want the email parser to copy. I selected each topic, too, and gave each item a unique name.
Once that’s done, click the blue Save Address and Template button at the bottom of the page. Now your parser is ready to work.
The parser will work best if the text you select is something written the same way in every email—perhaps a number after the word Total or a link written after the words Click here. (The value can change, though.)
Want to make Email Parser more reliable? Forward another similar email to the same address. Then, beside your parser’s name in the Mailboxes list, click View Emails to see all the emails this mailbox has received.

Click Show on one of the items to see the text of the email.

The text that Email Parser selected will be in yellow.

If anything looks incorrect (like in my example above), click the Edit extra template link near the bottom of the page. Select the same text you’d originally wanted to copy from your emails, give it the same names, then save the new template. Repeat that as many times as you want to make your parser more reliable.
You can use this same technique to parse any kind of email you get. For example, you could teach it to recognize client names and project budgets in vendor confirmations.
4. Automatically forward new emails to the parser
The email parser you made is now ready to copy text from other similar emails—the Zapier blog newsletter, in this case. We need to send every new newsletter to the email parser.
The best option is to automate things with a filter in your email app to automatically forward messages that match the one you sent to Email Parser. Typically, your notification emails will all have something in common—they come from the same sender and often have the same subject. For my example, those emails come from blog@send.zapier.com and contain the words “Recommended reading from the Zapier blog team.”
To watch for those emails in Gmail, you’ll first need to add your email parser address to Gmail to automatically forward emails. Here’s how:
-
Open your Gmail Forwarding settings—click the gear icon, select Settings, then click the Forwarding and POP/IMAP tab.
-
Click Add a forwarding address.
-
Enter your @robot.zapier.com email in the text box and click Next.
-
Check your email—Zapier should send you a confirmation email from Gmail. If you don’t see it, check the Email Parser app’s mailbox—it should have the email. Either way, copy the confirmation code, then paste it in the box back in your Gmail Forwarding settings.
Now you can have Gmail automatically forward emails to your email parser. First search for the email address and/or subject of the messages you’ll have the email parser process. I’ll enter from:blog@send.zapier.com AND Recommended reading from the Zapier blog team. Click the tiny down arrow on the right of the search bar to see the full Advanced Search options—then click the Create filter button or link in the lower-right corner. Have that filter forward the email to the email parser address you just added—and you should be all set.
Now, every time Deb at Zapier sends you the latest Zapier newsletter—or whatever email messages you want to parse—Gmail will send it along to Email Parser.
If you use another email service, check your documentation to see if your app or service can automatically forward email messages.
5. Put your parsed email data to work
Copying text out of emails alone isn’t enough—you need to do something with that data. The easiest option is to connect Email Parser to Zapier, which lets you send data from your emails to thousands of other popular work apps—from Airtable to Zoho CRM. Here’s how to do it:
-
Go to zapier.com and log in or sign up if you haven’t already. Then go to the Zap editor to get started.
-
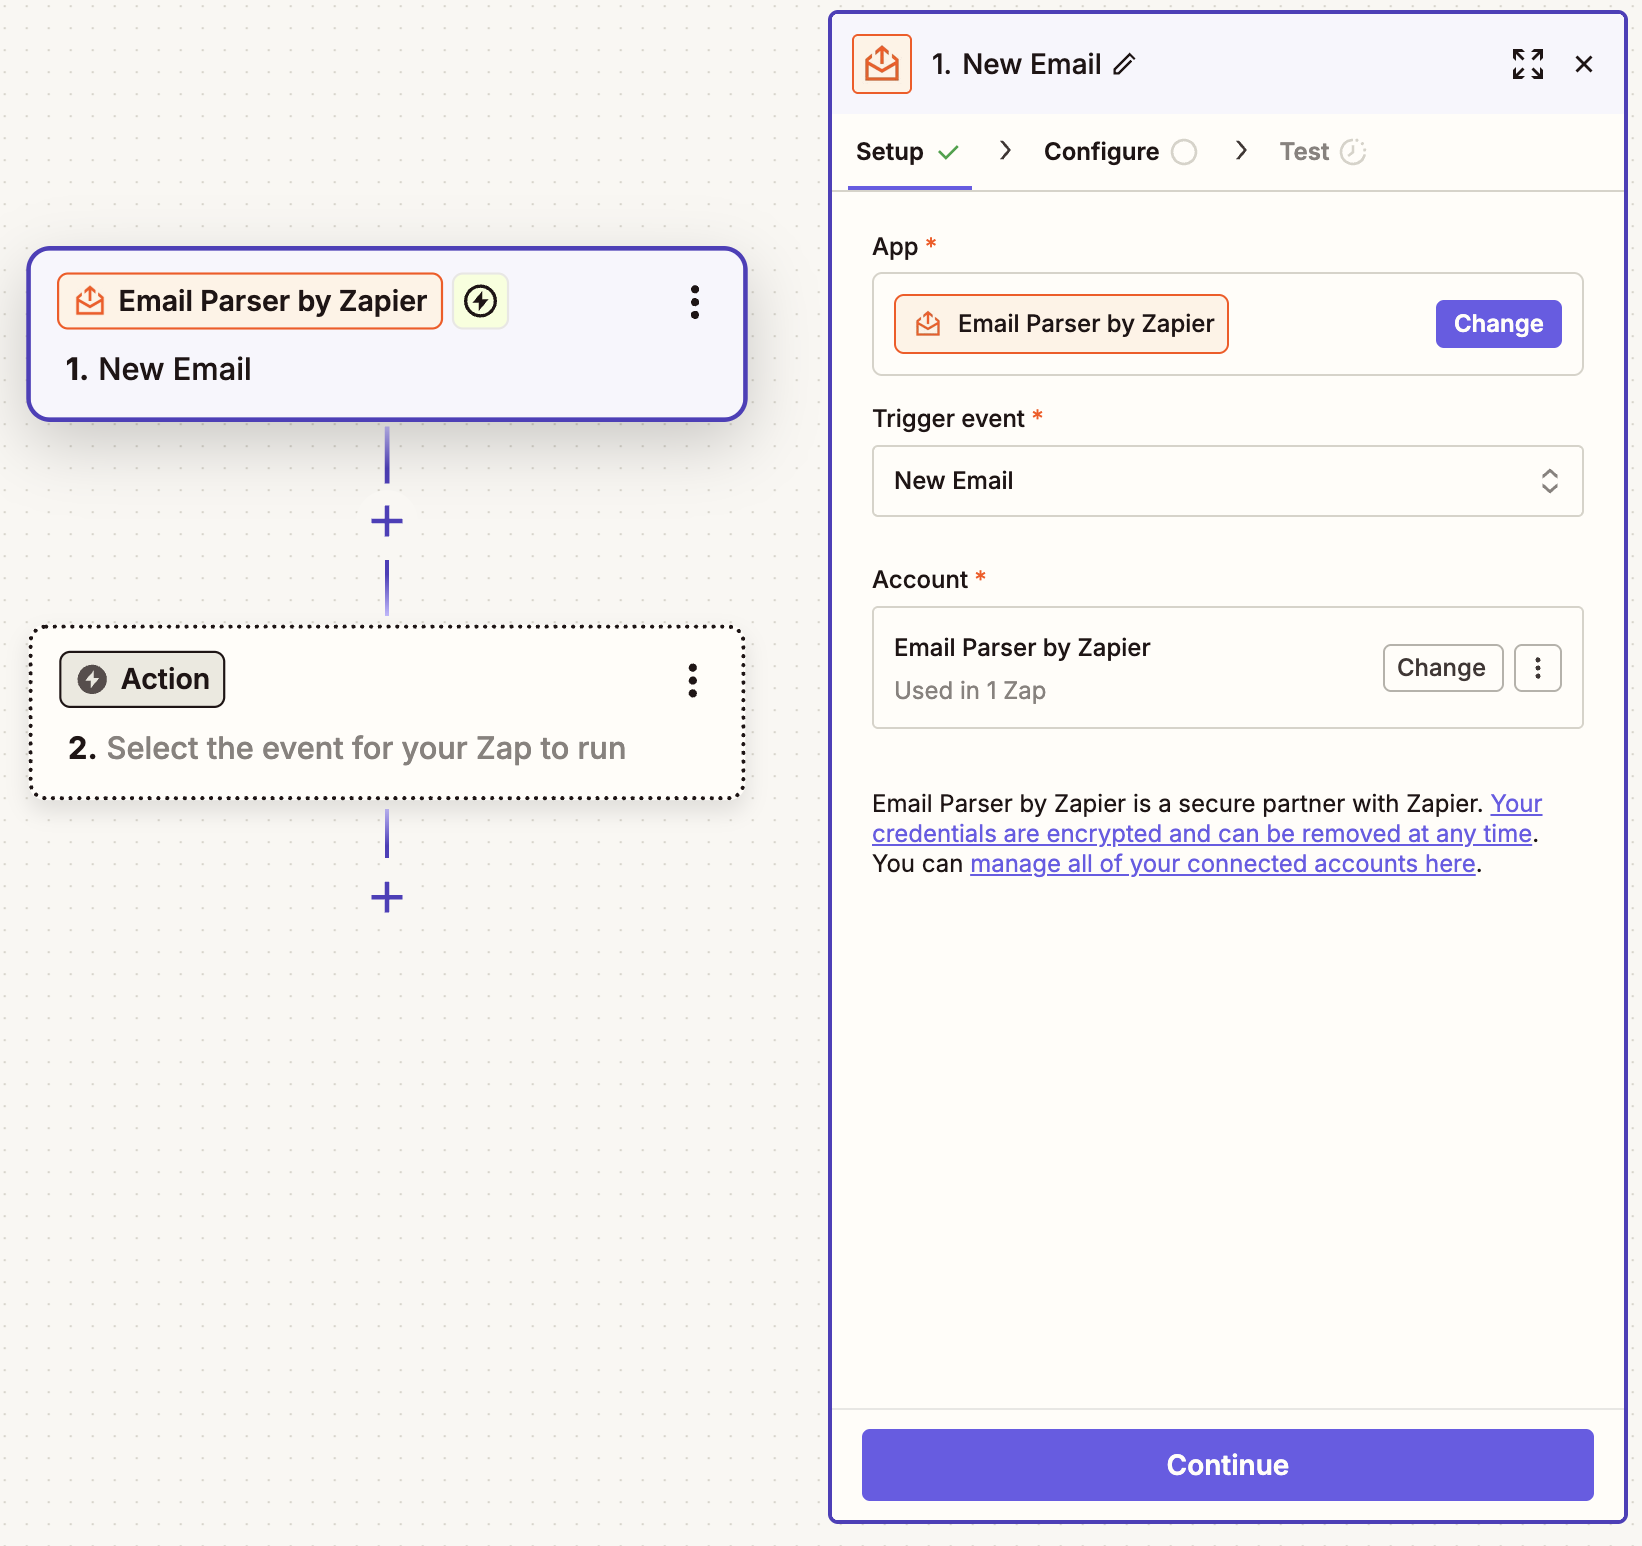
Select Email Parser as the trigger app, then choose the New Email trigger event. Connect your Email Parser account if you haven’t already, and pick the parser address you just set up. Click Continue.
-
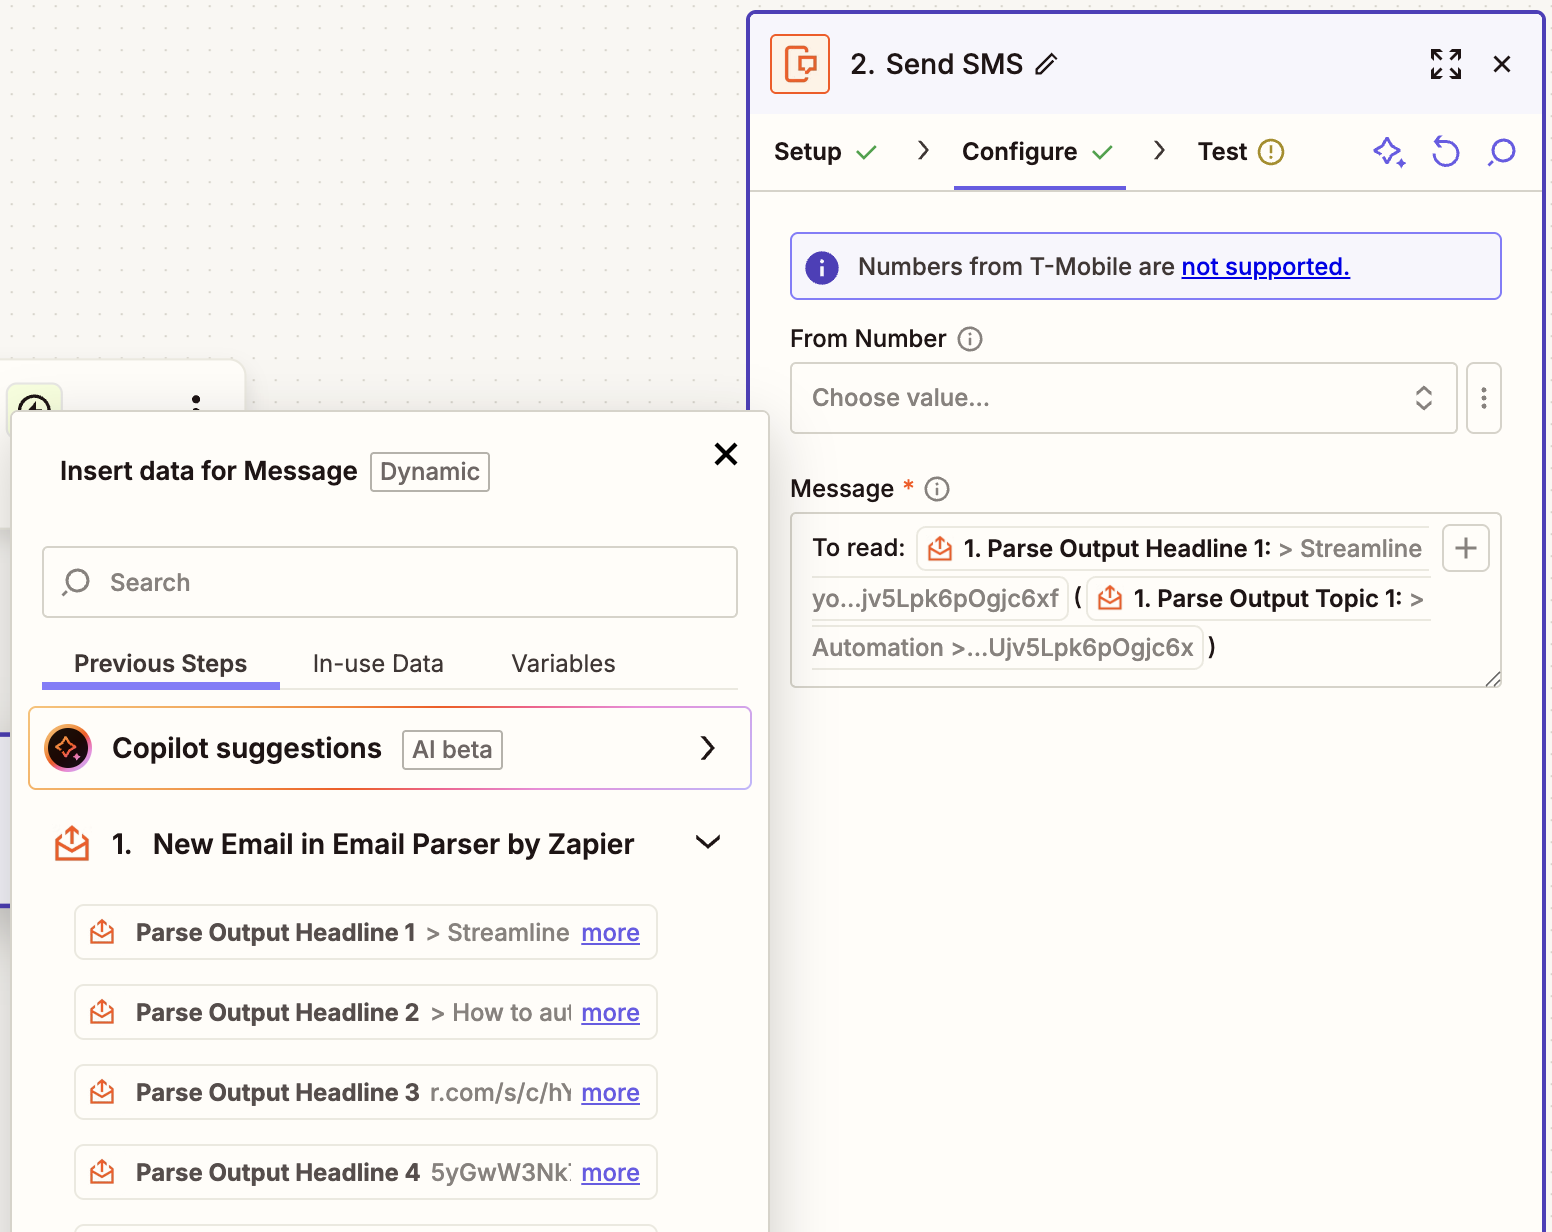
Now, put your email data to work. In the action step, select the app you want to send your email data to. I want to get an SMS notification about the latest headlines, so I picked SMS by Zapier as my app and Send SMS as my action event.
-
In the Configure tab, map data from the trigger step. (This is what enables you to actually use your email data.) To do this, click the + sign or type a forward slash (/), which opens a modal that lets you select and insert values. I decided to map the topics and headlines I collected in Email Parser—but you can use your email data however you want. When you’re done, click Continue.
-
Test your Zap to make sure everything works the way you want it to, then turn it on, and you’re done!


How to save your email parser data with Zaps
If you’re like me, you’ve got a lot of emails that you know you want to automate already, but you’re not quite settled on where all the information needs to be sent yet. In those cases, it can be handy to get a Zap up and running that parses the emails and saves them to a spreadsheet, so you can come back to the nicely organized data later on.
Click on one of these recommended Zaps to start saving parsed emails to Google Sheets or Airtable right away, or to set up your own SMS notification for email:
Now that you’re parsing your email, learn more ways you can automate that information and put it to work in other apps. Automatically send parsed information to your task or project management app, set up custom notifications, create calendar events, update contacts, and more.
Spend less time in your inbox with Email Parser by Zapier
With an email parser and Zapier workflows, you can automatically extract data from incoming emails and put it to work in other apps—no more copying and pasting from your inbox. Need help getting started? Check out our help documentation. Ready to start parsing emails? Create your Email Parser mailbox, and check our our app directory for more ways to automate your inbox.
This article was originally published in October 2018 with previous updates from Tyler Robertson. It was most recently updated in July 2025 by Steph Spector.