I share my screen in Zoom meetings all the time. And yet, every time I go to share my screen, I spend a few awkward seconds hovering over the toolbar as if I’ve never seen the Share button before. Then I found the keyboard shortcut to share instantly. Technically, it saves me only one click—but it also saves me from looking like someone who just opened Zoom for the first time.
There are plenty of other useful Zoom features to help you look like a pro Zoomer, too. Here are 21 of my favorite Zoom tips, organized by when you’ll need them: before, during, or after a meeting.
Before a Zoom meeting
During a Zoom meeting
After a Zoom meeting
Note: Some of the tips include Zap templates (what we call our pre-built workflows at Zapier). Simply click on the Zap template to get started. You’ll need a Zapier account if you don’t already have one.
Zoom web portal vs. Zoom desktop client
Let me clarify one thing: The Zoom web portal and Zoom desktop client are not the same thing. Here’s the difference:

For reasons unbeknownst to me, the Zoom desktop client and mobile app have different features than the Zoom web portal. Additionally, you need to select Save for any edits made in the web portal, whereas Zoom automatically saves most changes made in the Zoom desktop client or the mobile app.
I’ve crossed my fingers for years now that Zoom would allow you to update all your settings directly from the web portal or Zoom desktop client. But as it turns out, that’s not a surefire method for achieving wish fulfillment. Anyway, let’s dive in.
Zoom tips: Before a meeting
Before most Zoom meetings, I do a little pre-call scramble: adjust my lighting, check my background, and hope my mic isn’t randomly picking up lawnmowers. But a lot of that stress is avoidable with the right settings in place ahead of time. Use these Zoom tips help you show up prepared to your next meeting.
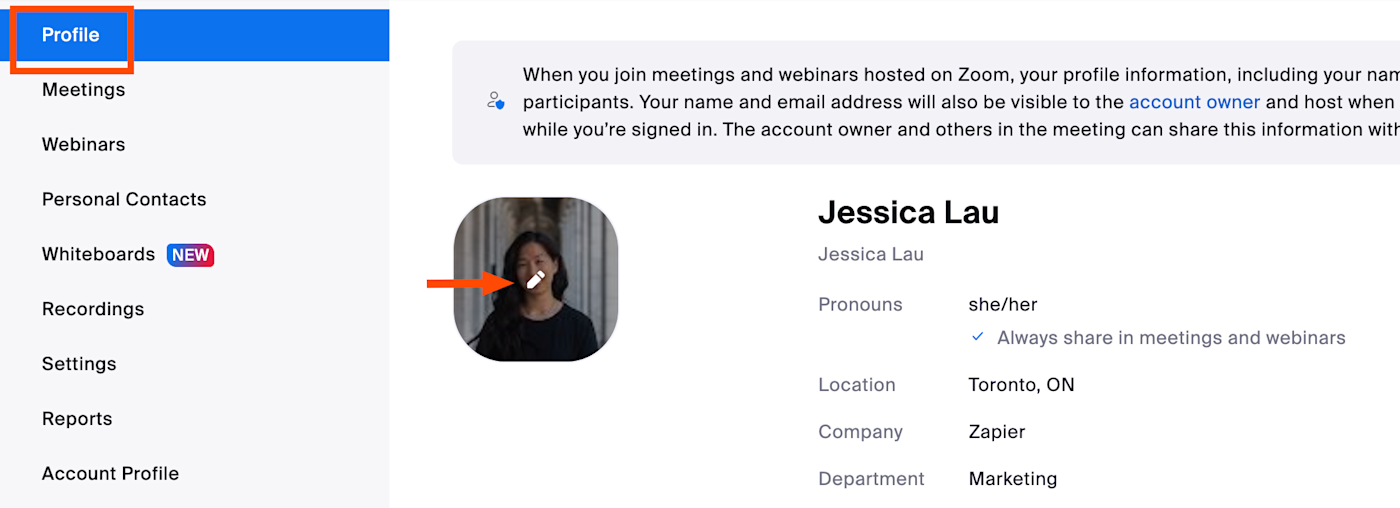
1. Add a profile picture
There are plenty of occasions when you’d rather not show your face live on Zoom—but you also don’t want to be just a black box with a name. Get the best of both worlds: Here’s how to add a profile picture in Zoom, which will appear instead whenever your video’s off.
-
Log in to your Zoom web portal.
-
Click Profile.
-
In the main section with your name, click the pencil icon in the picture frame.
-
Click Choose Files to upload your picture.
-
Click Save.

2. Mute Zoom audio when joining a meeting
No one wants to be that person who joins a meeting late, only to have their dog bark and interrupt the speaker because of course that’s when your mute button disappears from view. Here’s how to mute your audio by default.
-
Log in to your Zoom desktop client.
-
Click your profile picture, and then select Settings.
-
In the Settings window, click Meetings & webinars.
-
Under Join experience, click the toggle next to Keep my microphone muted.

3. Turn your Zoom video off by default
Despite my best efforts, I always remember to check for food in my teeth after I’ve joined a meeting. If you, like me, regularly need an extra moment before you’re camera-ready, here’s how to join Zoom meetings with your camera automatically turned off.
-
Log in to your Zoom desktop client.
-
Click your profile picture, and then select Settings.
-
In the Settings window, click Meetings & webinars.
-
Under Join experience, click the toggle next to Keep my camera off.
4. Give attendees a waiting room
If you’re hosting a meeting, it’s a good idea to give attendees a waiting room where they can hang out until you let them into the main room.
-
Log in to your Zoom web portal.
-
In the side panel, click Settings.
-
Click the Meeting tab.
-
Under Security, click the toggle next to Waiting Room.

Now, attendees will automatically be placed in a waiting room for every meeting, and you’ll have to manually let them in.
If you want to enable waiting rooms only for specific meetings, you can also set this up. When you schedule the meeting, click the Waiting Room checkbox (under Security).

5. Automatically schedule meetings—and let people know about them
Scheduling Zoom meetings eats up a surprising amount of time—especially if you run a lot of them. With Zapier, you can connect Zoom with your calendar or scheduling app—along with thousands of others—so you can automate your meeting-related workflows. Create Zoom meetings for new calendar events, add Zoom links to calendar invites, and send meeting reminders. Here are a few pre-made workflows to get you started.
Zapier is the most connected AI orchestration platform—integrating with thousands of apps from partners like Google, Salesforce, and Microsoft. Use interfaces, data tables, and logic to build secure, automated, AI-powered systems for your business-critical workflows across your organization’s technology stack. Learn more.
6. Schedule recurring meetings with the same URL
To minimize last-minute messages of “Where’s the meeting link?”, Zoom lets you schedule recurring meetings with the same URL. Here’s how.
-
Log in to your Zoom web portal.
-
In the side panel, click Meetings.
-
Click Schedule a Meeting.
-
Edit the meeting options as needed.
-
In the Time Zone field, check the Recurring meeting box.
-
Edit the recurrence, including the number of times the meeting occurs and how often it occurs.
-
Click Save.
If you export the meeting to your Google Calendar, Outlook Calendar, or Yahoo Calendar, the recurrence pattern and meeting URL are automatically included in the calendar event. Plus, the meeting settings remain locked, so you don’t have to update it for every meeting.
Additionally, if you meet with the same group but on an irregular schedule, you can also set your recurrence to No Fixed Time. This lets you use the same settings and meeting URL no matter when you get together. When I teach, I use this option to host open office hours for student meetings.
Note: You can’t schedule recurring meetings with your Personal Meeting ID (PMI) since this ID is reserved for you and the link never changes. Also, meeting IDs expire after one year, so you’ll have to generate a new one then.
7. Give someone else scheduling privileges
If someone else manages your calendar and bookings, here’s how to give them Zoom privileges so they can schedule meetings on your behalf.
-
Log in to your Zoom web portal.
-
In the side panel, click Settings.
-
Click the Meeting tab.
-
Under Schedule Privilege, click Add.
-
Add your scheduling assistants by inputting their email addresses. Click Save.
Once done, your assigned scheduling assistant must log out of their Zoom desktop client and log back in for the feature to take effect.
This feature is also helpful if your assistant has scheduled a meeting, but the meeting host needs to be changed from you to someone else. Here’s how to transfer a meeting between Zoom users.
Requirements: The primary Zoom account holder and everyone who receives scheduling privileges must share the same account or have linked accounts. Everyone must also be Licensed or On-Prem. And for webinars, everyone must have the webinar add-on.
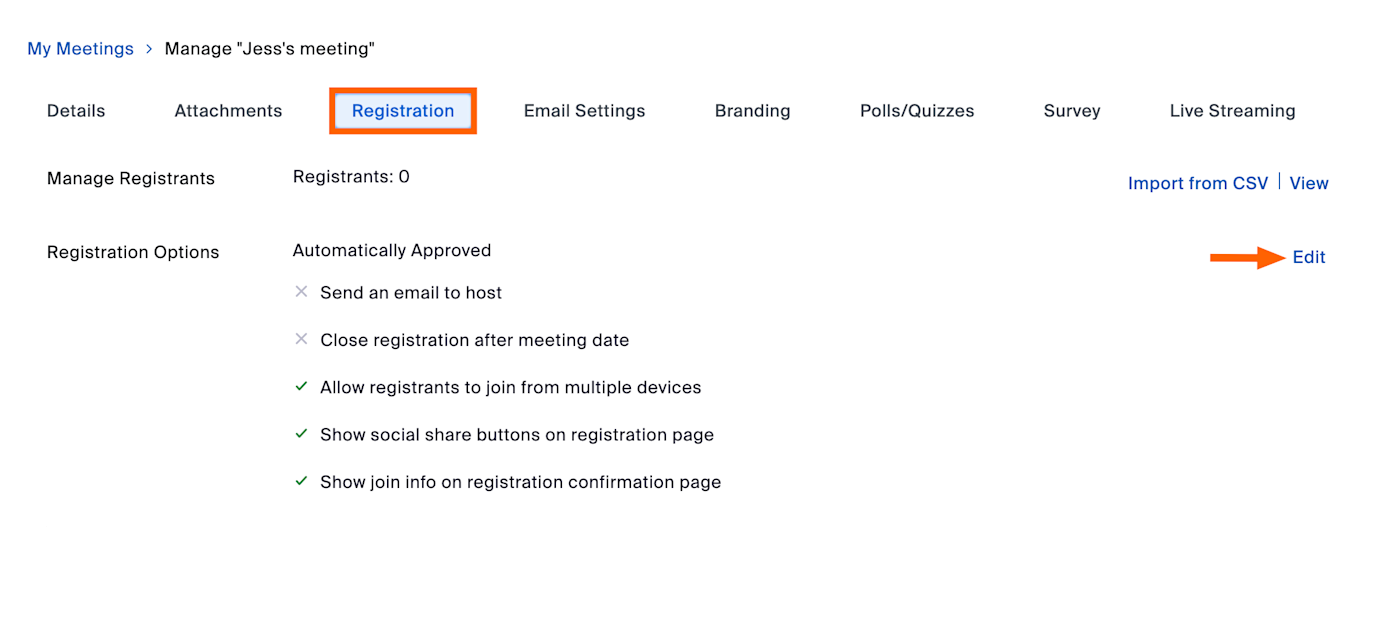
8. Collect information from attendees
For any number of reasons, you may want to ask attendees to share a few details about themselves prior to joining the call. For example, you might want to require that attendees provide their name, company affiliation, or industry.
Here’s how to collect this information.
-
Log in to the Zoom web portal.
-
In the side panel, click Meetings.
-
Click Schedule a Meeting.
-
Next to Registration, click the Required checkbox.
-
Click Save.
-
After you’ve created the meeting, click the Registration tab, and then select Edit.
-
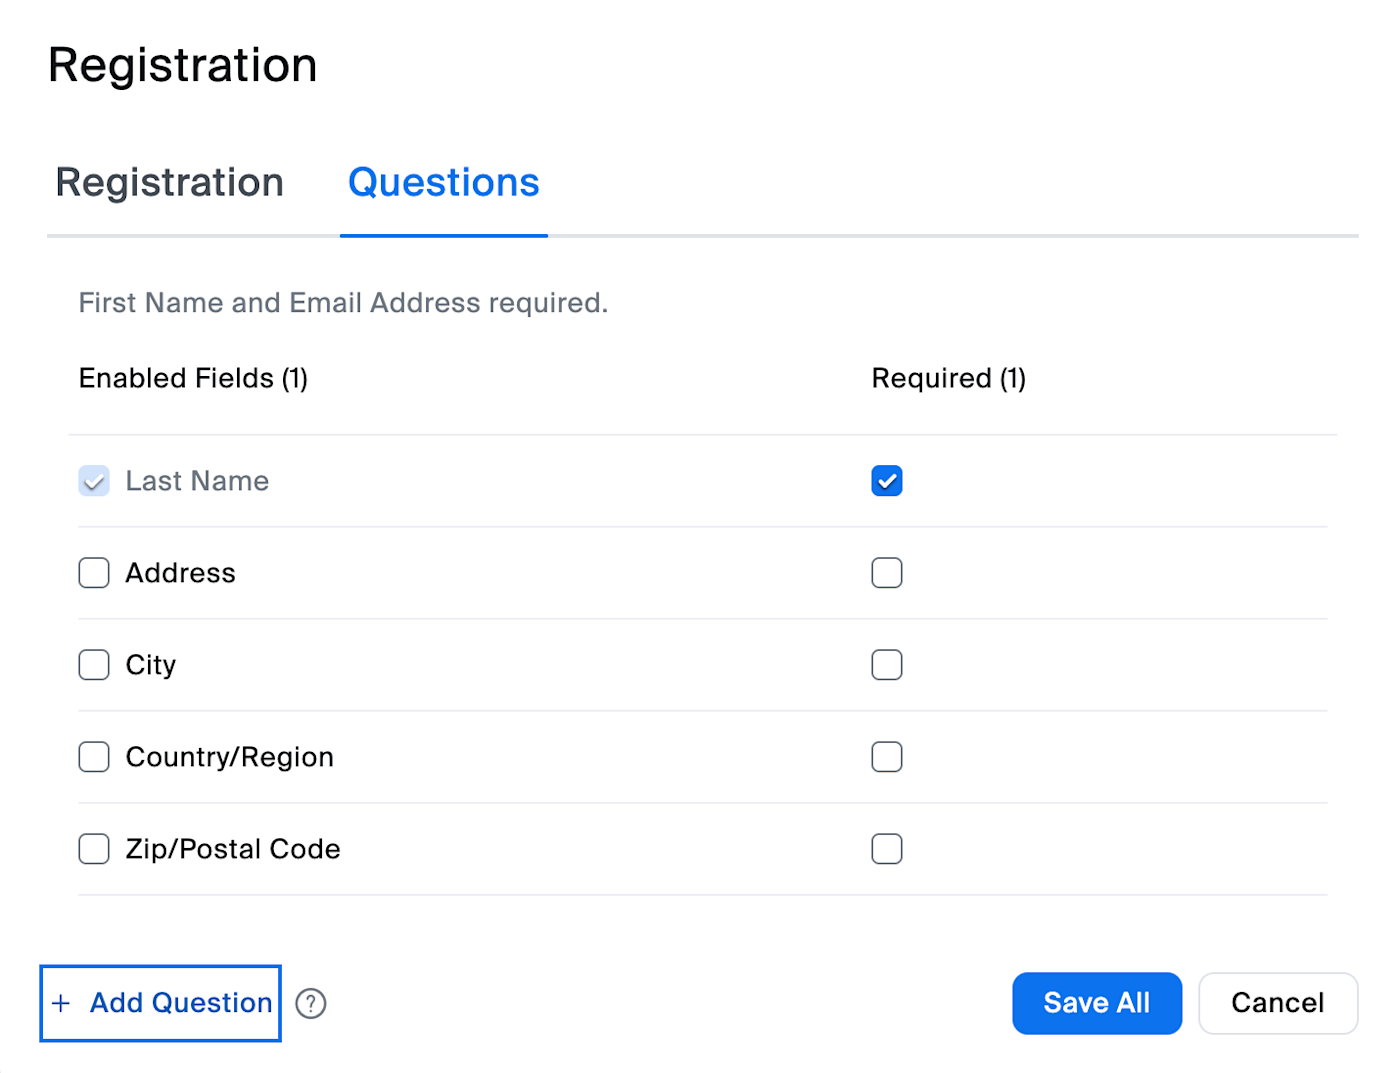
In the Registration window, click the Questions tab. Here, you can add standard fields, such as name and organization, by selecting the checkbox next to the field name. To make specific fields mandatory, select the Required checkbox to the right of the field name. You can also create your own questions by clicking Add Question.
-
Click Save All.


If you’re using Zoom to run a digital event like a webinar, you might want to let attendees register using a form on your website or an event management app instead. Here are some handy pre-made Zaps that automatically register all attendees, regardless of where they sign up.
You can make this automation even more powerful by making sure that any registrant information collected is also added to your CRM or email marketing tool, so you can easily follow up with potential leads or customers.
Requirements: This feature is limited to hosts with a paid Zoom account. The meeting must also be generated automatically (you can’t use your PMI) and cannot be a No Fixed Time recurring meeting.
9. Learn a few of the most useful Zoom keyboard shortcuts
Zoom has quite a list of keyboard shortcuts, but here are my go-tos that I think are worth learning.
I is for invite. Press command+I (macOS) or Alt+I (Windows) to jump to the Invite window, where you can grab the link to the meeting or send invitations to others via email.
M is for mute. Press command+control+M (macOS) or Alt+M (Windows) when you’re the meeting host and want to mute everyone else on the line. If using windows, press Alt+M again to unmute. For mac, press command+control+U (macOS).
S is for share. Press command+shift+S (macOS) or Alt+Shift+S (Windows) to share your screen.
Zoom tips: During a meeting
Once your Zoom meeting kicks off, you’re juggling a lot: screen sharing, staying on mute (until you’re not), and trying not to accidentally share your inbox instead of your slides. These Zoom tips help you stay focused, collaborate smoothly, and actually look like someone who has Zoom figured out.
10. Record a Zoom meeting as a video
Zoom lets you record your web conferencing calls as videos, a handy feature for sharing the meeting with people who may have missed it or for reviewing what was said.
Note: If you record meeting attendees’ video or audio, it’s common courtesy—and in some places a requirement—to inform them before you do. Once you begin recording, Zoom will also notify all participants that the meeting is being recorded.
When you record, you must choose whether to use the local or cloud option. Here’s the difference:
-
Local means you store the video file yourself, whether locally on your computer or in another storage space that you provide.
-
Cloud means Zoom stores the video for you in its cloud storage. One major convenience of the cloud option is that people can stream the video in a web browser once it’s ready. This option is available for paying users only. The amount of available cloud storage will vary depending on the account type.
When creating a video from a conference call, it makes a big difference in the final quality if you optimize a few settings in advance. For example, some calls might be broadcast-style, where only the host appears on screen. In that case, set Zoom to only record the audio and video of the host. Other calls might be in the style of a collaborative meeting, in which case you want to record everyone. Be sure to check out Zoom’s local recording settings and cloud recording settings at least a few minutes before starting a call.
Requirements: To record videos, you need Zoom on macOS, Windows, or Linux. If you don’t have the option to record, edit your recording settings in your Zoom web portal or have your account administrator enable it.
If you need to share the recording later, try one of these Zaps to automatically share once the recording has finished.
11. Turn on closed captions
One of the perks of working remotely is that I can take meetings anywhere, including a noisy coffee shop. The only downside is that it makes it tricky to hear what people are saying in meetings (even with headphones on). That’s where it’s helpful to turn on closed captions.
To do this, click Show captions in the Zoom control bar. If you don’t see this, you may have to first click More, and then select Captions. Click the up arrow (∧) next to Show captions to reveal even more features:

-
Choose your language. Zoom currently supports 35 different languages for automated captioning.
-
View full transcript. This gives you a view of everything that’s been said in the meeting so far—not just what’s currently being said.
-
Caption settings. This lets you change the font style, size, color, and position.
-
Set up manual captions. If you’re the meeting host, you can assign an attendee to manually type the captions.
-
Adjust other host caption controls. This lets you enable or disable closed captions, as well as set the caption language (attendees won’t be able to change it).
Note: Whether you’re hosting a meeting for two or 200, don’t wait for someone to request closed captioning—always enable Zoom’s closed captions. The feature isn’t 100% accurate, but it’s a positive step towards making meetings more accessible.
12. Add a co-host
Double the hosts, double the fun! That’s a saying, right? Here’s how to add a co-host to your Zoom meeting.
-
Once your co-host has joined the meeting, click Participants in the Zoom control bar.
-
Hover over the name of your co-host, and click More.
-
Click Make Co-Host.
Requirements: To use co-hosting, you need a Pro, Business, Education, or API Partner account with Zoom, and you need to run on macOS, Windows, Android, or iOS.
13. Pin participants’ videos
If you join a meeting with your camera on and your dog in the background, I will privately message you to ask your dog’s name, nicknames, and quirks. Which is to say, I’m very easily distracted. But when I need to reign in my focus, I pin the speaker’s window so everyone else is hidden. Here’s how.
-
During a Zoom meeting, hover over the video of the participant you want to pin.
-
Click the menu (
…) > Pin. You can pin up to 9 total videos.
14. Turn on Zoom gallery view
Let’s say you’re teaching a class or taking a class—it can be helpful to see everyone in the meeting. Here’s how to turn on the gallery view in Zoom.
-
During a Zoom meeting, click View in the top-right corner.
-
Select Gallery. If the meeting has 49 or fewer attendees, you may need to adjust the size of your window to see all windows displayed on one page. If your meeting has more than 49 attendees, you’ll have the option to navigate through multiple pages.
15. Mute and unmute with the space bar
I have no problem playing favorites, and this Zoom tip is inexplicably my favorite.
If you’re on mute and need to speak, press and hold your spacebar while in the Zoom app to quickly unmute. Be sure to hold the spacebar down while you’re talking.
Note: This push-to-talk feature won’t work if you’re actively using another application (which is great if you’re multitasking).
16. Raise your hand (and give other non-verbal feedback)
So you’ve asked a question in the chat, but it looks like the speaker may have missed it. You don’t want to interrupt, so what do you do? Raise your hand!
In the control bar, select React > Raise Hand. This will pin a ✋ to the top of your video and move your thumbnail to the top of the gallery, which will hopefully catch the attention of the speaker. To lower your hand, select React > Lower Hand. If you don’t see these options, you may need to ask the host to enable non-verbal feedback.

While you’re there, you can choose other meeting reactions—for example, thumbs up, heart, and clapping hands—or non-verbal feedback—for example, yes, no, slow down, and speed up.
If you’re constantly raising your hand or giving a thumbs up, save yourself a click.
-
In the Zoom control bar, click the up arrow (
∧) next to React. -
Click Recognize hand gestures.
17. Have a collaborative annotation session
When screen sharing, it can be immensely helpful to point participants to specific areas of your screen or to let everyone draw on visual materials, such as mockups or graphic designs. Zoom has built-in annotation tools for this.
-
Share your screen (or have someone else share their screen).
-
Click Annotate in the Zoom control bar.
-
Select any of the tools that appear in the floating toolbar.

Here are a few of my favorite annotation tools:
-
Spotlight: Turn the host’s cursor into a red dot or arrow (available only to the participant who started a screen share or whiteboard).
-
Stamp: Choose a shape—for example, a checkmark, X, or heart—and click anywhere on the screen to stamp it.
-
Vanishing pen: Mark up a shared screen or whiteboard. The markings will fade away within a few seconds, so you don’t have to erase or undo your previous drawings (available only to the participant who started a screen share or whiteboard).
To disable attendee annotation altogether, select More (...) in the Zoom control bar, and then select Disable annotation for others.
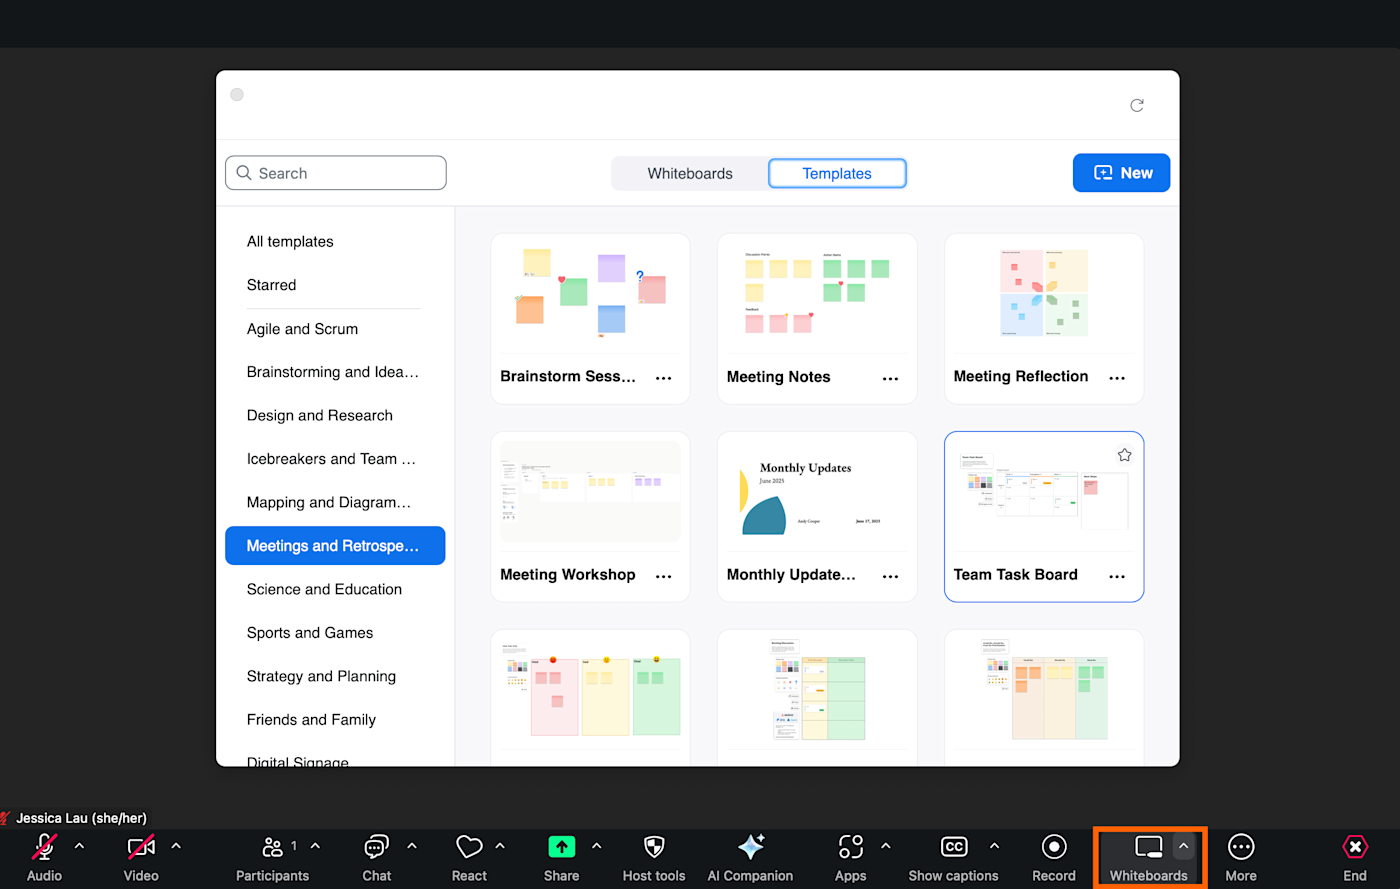
18. Brainstorm ideas on a Zoom Whiteboard
Zoom’s annotation tools are useful for a simple collaborative experience. But if you need more advanced capabilities—like sticky notes, flowchart builders, and the ability to upload images directly to your shared screen—try using Zoom Whiteboard.
-
Click Whiteboards in the Zoom control bar.
-
Select New whiteboard to start from scratch, or click Existing whiteboards to choose from an existing template. If you go with the template option, click the template you want to use, and then click Use template.
-
Zoom will automatically share your screen, showing only the whiteboard and editing tools.

From there, you can mark up your whiteboard in many of the same ways you can on other online whiteboards. You can even add a timer to the screen, which is helpful if you want to give participants a time limit to contribute ideas.
By default, all participants will be able to edit the board. To change this, click the dropdown next to the list of participants in the top-right corner, and click the toggle next to Meeting participants can edit.

To add more pages to your whiteboard, click the Page icon in the top-left corner, and then click Add page. Note: You can only add blank whiteboard pages—not templated ones.

If you want to share your final whiteboard, you can share a direct link to it, or you can export it as a PDF, PNG, or PowerPoint.
19. Take and share notes
Raise your hand if you’ve ever tried to live-type meeting notes in a separate Google Doc, only to miss half the conversation while hunting for the right tab to switch back to. Same.
Zoom’s solution: Zoom Notes—a built-in note-taking app that pops open right inside your meeting window. To access it, click Notes in the Zoom toolbar. If you don’t see it, click More (...), and select Notes.
Now you can jot down ideas in a distraction-free canvas that everyone on the call can see and edit, if you let them.

If you need something richer—like a project brief or multi-page agenda—spin up a Zoom Doc instead.
-
Click Docs in the Zoom toolbar (or click More > Docs).
-
Create a new doc any way you want:
-
From scratch. Click Create to co-edit a new doc.
-
From your existing docs. Click any of your recent docs, and then select Share in meeting. You can also click Open privately to keep the doc to yourself—it’ll appear in the side panel.
-
From a template. Click the Templates tab, select the template you want to use, and then click Share in meeting.
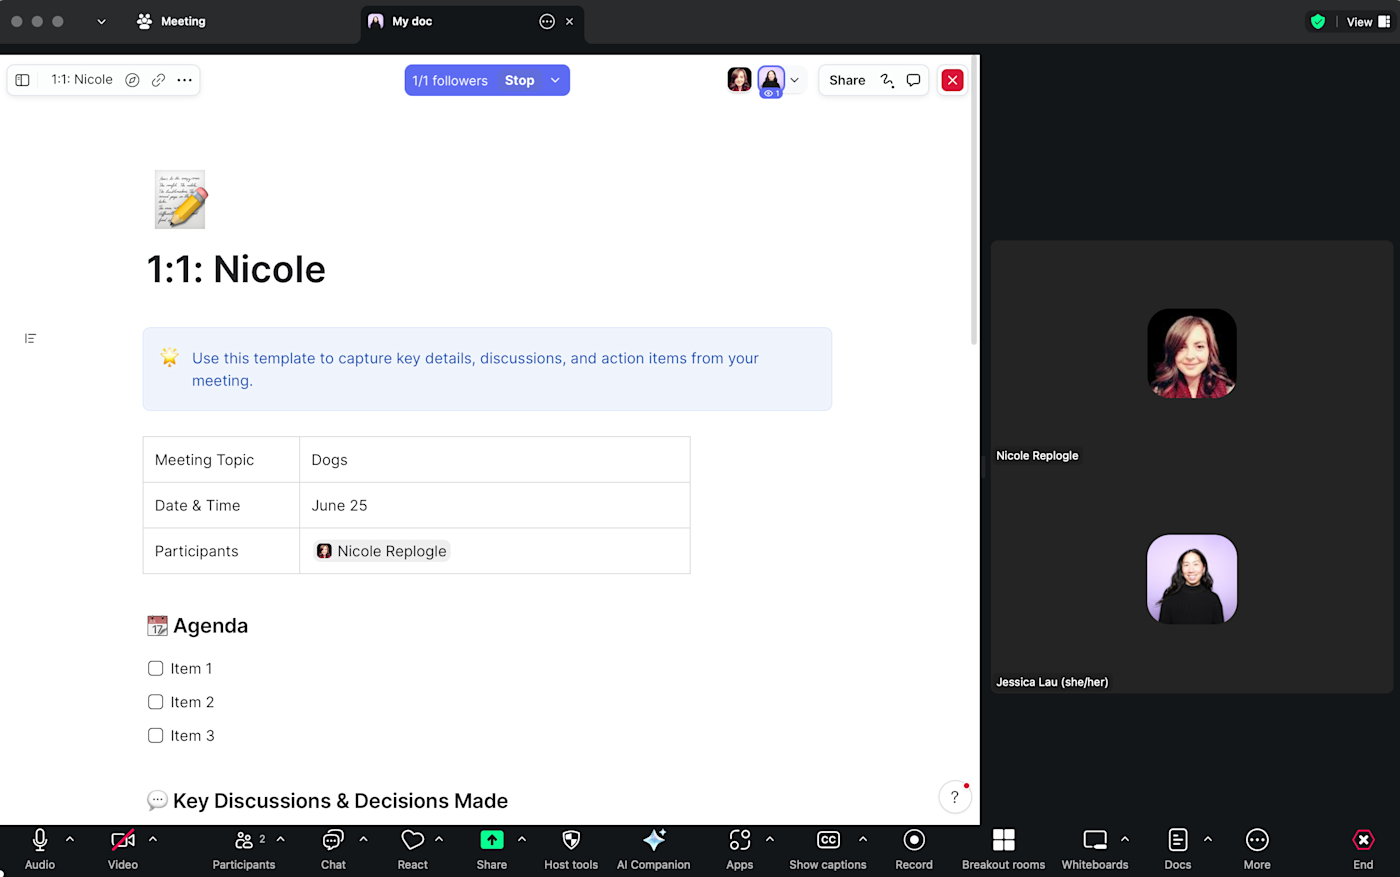
-
-
Live edit the doc as you normally would.

Both Notes and Docs sync with your Zoom account, so you can keep adding context long after you end the meeting. To access them, log in to your Zoom web portal, and click Notes or Docs in the side panel.

Zoom tips: After a meeting
The meeting’s over—but your work isn’t. Whether you’re trying to remember who said what or just figure out who actually showed up, these Zoom tips help you wrap things up without digging through recordings or chasing down attendees.
20. Get AI-powered meeting summaries
My post-meeting routine mainly involved replaying the recording at 1.5x speed to remind myself of what next steps I’d absent-mindedly agreed to. But now, I can use Zoom’s AI companion to automatically generate meeting summaries, complete with key moments and action items. The AI can also reference anything you captured in Zoom Notes or Zoom Docs, so the summaries will reflect the collaborative edits you made.
This feature is disabled by default, so you’ll have to enable it first.
-
Log in to the Zoom web portal.
-
Click Settings in the side panel.
-
In the AI Companion tab, scroll down to Meeting, and click the Meeting summary with AI companion toggle.
-
Adjust the meeting summary and share settings as needed.
-
Click Save.

Once your meeting has finished, here’s how to access your meeting summary:
-
Email. If you enable email summaries, you’ll automatically receive an email summary once it’s available.
-
Zoom web portal. Click Summaries in the side panel, and then select the meeting you want the summary for.
-
Zoom desktop app. Click Team Chat, and select the name of the meeting you want the summary for. You’ll then see your entire meeting chat, along with your meeting summary.

Zoom will also automatically add action items to your recommended list of Zoom Tasks. To add them to your task list, click Accept next to the task.

21. Check who attended a Zoom meeting
Say you’re using Zoom to hold a mandatory event, like a university lecture or a training session. You probably want to know who attends. You can get that information from a report once the meeting is finished. Here’s how.
-
Log in to your Zoom web portal.
-
In the side panel, click Reports.
-
In the Usage reports tab, select Meeting and webinar registrations. Edit the meeting report fields, including the date of the meeting and type of report you want to create (registration). You can search for a meeting using your meeting ID.
-
From the list of available reports, click Generate for the report you want.
Requirements: To generate an attendee list, you need to be 1) the host of the meeting, 2) in a role with Usage Reports enabled, or 3) an account administrator or owner. You also need a Pro, API Partner, Business, or Education plan.
More Zoom tips
Not enough for you? For more inspiration on how to use Zoom effectively, here’s every other tip we have:
Working with sound
Updating your background or display
Facilitating meetings
Oh, and one last gift for you: Here’s how to automatically close those annoying “Launch Meeting” tabs from Zoom.
This article was originally published in November 2018. The most recent update was in June 2025.